ビットコインを支える技術として注目をされているブロックチェーンですが、仕組みはそれほど複雑ではありません。
- 複数のトランザクションをブロック単位で管理
- ブロックに前のブロックのハッシュ値をもたせてチェーンのようにつなげることで特定のブロックの改善を困難化
- ブロック生成にコスト(時間)をかけるマイニング=プルーフ・オブ・ワーク
- トランザクションに電子署名をして、なりすましを防止
- P2Pネットワークを構築し、ブロックチェーンを全ノードで共有
これらをjavasriptで実装しながら理解していきます。
イントロダクション
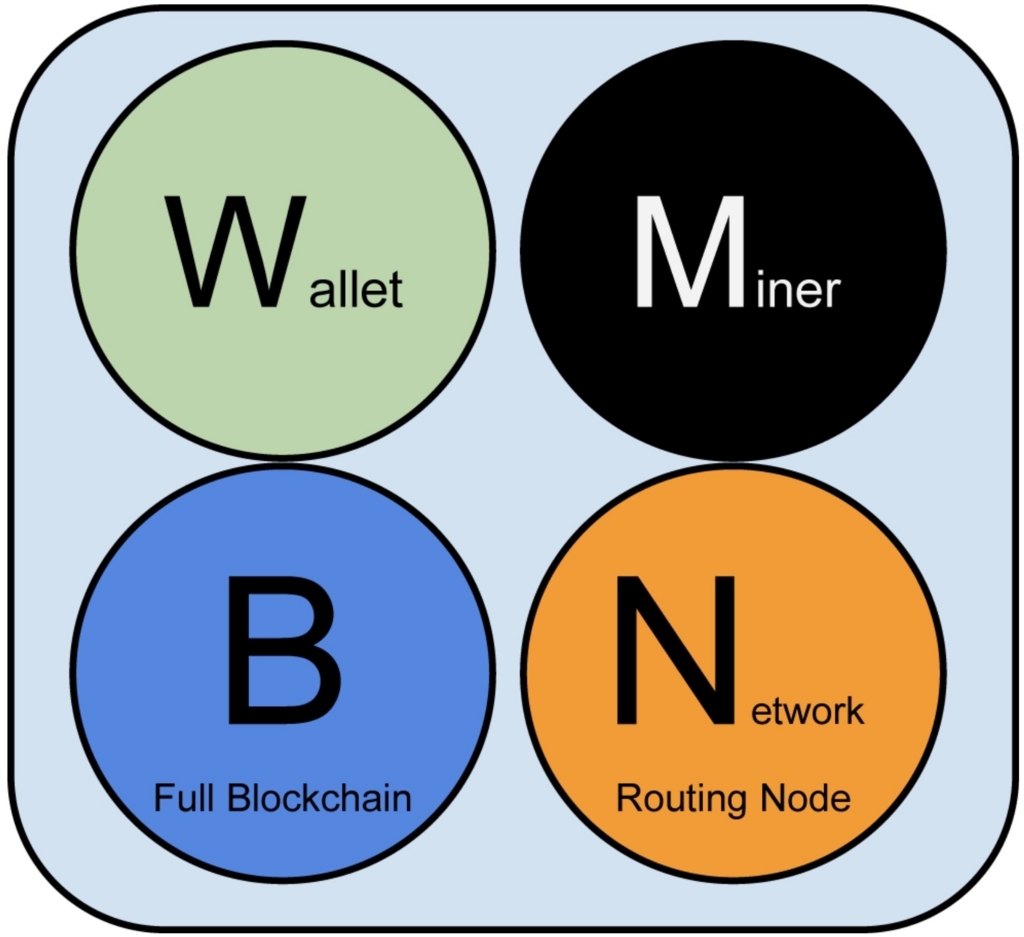
「ビットコインとブロックチェーン:暗号通貨を支える技術」によるとビットコインは4つの機能からできています。

- ブロックチェーン
- トランザクションのデータベース
- マイナー
- トランザクションを集めて、ブロックを作成する機能
- ウォレット
- 秘密鍵を管理し、トランザクションを作成するための機能
- ネットワークルーティング
- ネットワークに参加するための機能
ネットワークルーティングは全ノードにありますが、その他の機能は持っていなかったり、ブロックチェーンの一部だけを持っていたりします。
今回はフルノード(全機能)を実装します。
環境構築
nodejsベースで開発します。パッケージマネージャはYarnを前提にします。
Macの場合はこんな感じで。
$ brew install nodebrew
$ nodebrew install-binary v8.11.1
$ nodebrew use v8.11.1
$ brew install yarn --without-node
プロジェクトを作成します。
$ mkdir blockchain-js
$ cd blockchain-js
$ yan init
eslint、flow、jestを使いたいので追加しておきます。
$ yarn add -D babel-cli babel-preset-env
$ yarn add -D eslint eslint-config-airbnb-base eslint-plugin-import babel-eslint
$ yarn add -D flow-bin flow-typed babel-preset-flow eslint-plugin-flowtype
$ yarn add -D jest eslint-plugin-jest
package.jsonにscriptsを追加。
  "scripts": {
    "test": "jest",
    "flow": "flow",
    "lint": "eslint src"
  },
.bashrc
{
  "presets": ["env", "flow"]
}
.eslintrc.js
module.exports = {
  "parser": "babel-eslint",
  "extends": ["airbnb-base", "plugin:jest/recommended"],
  "plugins": ["flowtype", "jest", "import"],
  "rules": {
      "no-console": 0,
  },
  "env": {
      "jest": true
  }
};
flowの初期化
$ yarn flow init
ここまでのソースはGitHubの00_setupブランチに公開しています。
ブロックの実装
ブロックにはブロック作成日時(timestamp)、前回のブロックのハッシュ値、ディフィカルティターゲット(マイニング困難度)、ナンス、トランザクションを持ちます。
最初のブロックはgenesisブロックといってハードコードされています。そのためのgenesis()メソッドをつくっておきます。プロパティは適当に。
src/blockchain/block.js
// @flow

const DIFFICULTY_TARGET = 255;

class Block {
  timestamp: number;
  prevHash: string;
  difficultyTarget: number;
  nonce: number;
  transactions: Array<any>;

  constructor(
    timestamp: number,
    prevHash: string,
    difficultyTarget: number,
    nonce: number,
    transactions: Array<any>,
  ) {
    this.timestamp = timestamp;
    this.prevHash = prevHash;
    this.difficultyTarget = difficultyTarget;
    this.nonce = nonce;
    this.transactions = transactions;

  static genesis(): Block {
    return new this(0, '0'.repeat(64), DIFFICULTY_TARGET, 0, []);
  }
}

export default Block;
次のブロックに渡すためのハッシュ値を返すメソッドを用意しましょう。そのハッシュ値がディフィカルティターゲットを満たしているか検証できるようにisValidメソッドもつくります。
crypto-jsのsha256関数を使います。
$ yarn add crypto-js
src/blockchain/block.js
import SHA256 from 'crypto-js/sha256';
hash(): string {
    return SHA256(JSON.stringify([
      this.timestamp,
      this.prevHash,
      this.difficultyTarget,
      this.nonce,
      this.transactions,
    ])).toString();
  }

  isValid(): bool {
    const hash = this.hash();
    return Number(`0x${hash}`) < 2 ** this.difficultyTarget;
  }
今回は以下の計算結果をマイニング成功基準としました。
テスト
jestをつかってテストをします。flowが通るように、jestのflow-typedを追加しておきます。
$ yarn flow-typed install jest@v22.x.x
.flowconfig
[libs]
flow-typed
genesis、hash、isValidあたりのテストをつくってみましょう。
src/__tests__/blockchain/block.test.js
// @flow

import Block from '../../blockchain/block';

describe('Block', () => {
  let genesis;
  beforeEach(() => {
    genesis = Block.genesis();
  });

  it('genesis block', () => {
    expect(genesis.timestamp).toBe(0);
    expect(genesis.prevHash).toBe('0'.repeat(64));
  });

  it('hashは64桁の16進数', () => {
    const block = new Block(new Date(), genesis.hash(), 0, 0, []);
    const hash = block.hash();
    expect(/[0-9a-f]{64}/.test(hash)).toBe(true);
  });

  it('isValid()', () => {
    // 最小difficultyTarget
    const minDifficultyBlock = new Block(new Date(), genesis.hash(), 0, 0, []);
    expect(minDifficultyBlock.isValid()).toBe(false);

    // 最大difficultyTarget
    const maxDifficultyBlock = new Block(new Date(), genesis.hash(), 256, 0, []);
    expect(maxDifficultyBlock.isValid()).toBe(true);
  });
});
テストは問題なく通ると思います。
$ yarn test
ここまでのソースはGitHubの01_blockブランチに公開しています。
まとめ
今回は環境構築をして、ブロックの実装をしました。ブロックではハッシュ値の計算、ディフィカルティターゲットに基づいた有効性の検証ができるようになっています。
次回はブロックをハッシュ値で連結させて、ブロックチェーンの実装をします。
GitHub
GitHub - mizumotok/blockchain-js

- 作者: アンドレアス・M・アントノプロス,今井崇也,鳩貝淳一郎
- 出版社/メーカー: エヌティティ出版
- 発売日: 2016/07/14
- メディア: 大型本
- この商品を含むブログ (7件) を見る